Table of Contents
Are you craving a creamy, flavorful snack that’s both nutritious and satisfying? Look no further than our perfect gluten-free hummus recipe! This Middle Eastern classic has become a staple in kitchens worldwide, and for good reason. The silky smooth texture combined with the nutty flavor of tahini and the zing of fresh lemon creates a dip that’s impossible to resist.
What makes our gluten-free hummus recipe special is not just its incredible taste, but also its versatility. Whether you’re hosting friends for a casual get-together, packing school lunches, or simply looking for a healthy afternoon pick-me-up, this hummus has you covered. In just 15 minutes, you can whip up a batch that will transform your veggie snacks from ordinary to extraordinary.
Did you know that hummus dates back thousands of years? This ancient dish has stood the test of time because it perfectly balances nutrition and flavor. While traditional hummus is naturally gluten-free, some store-bought versions may contain additives that aren’t safe for those with celiac disease or gluten sensitivity. That’s why making your own at home is not only more delicious but also gives you complete control over the ingredients.
Just like our popular Cashew Cheese Dip Recipe, this gluten-free hummus pairs beautifully with a variety of fresh vegetables. We’re excited to share not just the perfect hummus recipe, but also four creative ways to serve it that will revolutionize your snacking routine. Ready to dive in? Let’s get started on your new favorite gluten-free treat!
What is Gluten-Free Hummus?
Gluten-free hummus is, quite simply, hummus heaven in a bowl without a speck of gluten in sight! But what exactly makes hummus “gluten-free,” you might wonder? Well, traditional hummus—that creamy blend of chickpeas, tahini, olive oil, lemon juice, and garlic—is naturally free from gluten. Surprised? Many people are!
The beauty of authentic hummus lies in its simplicity. There’s an old saying that “the simplest foods are often the most satisfying,” and hummus certainly proves this point. Whether you’re dipping, spreading, or dolloping, this Mediterranean marvel has been winning hearts (and stomachs) for centuries. They say “the way to a man’s heart is through his stomach,” but I’d argue hummus finds its way to everyone’s heart regardless of gender!
The gluten-free distinction becomes important when we consider commercially prepared varieties that might contain additives or flavorings with hidden gluten. That’s why our homemade version guarantees safety for those with celiac disease or gluten sensitivity. Ready to create some chickpea magic in your kitchen? Your taste buds will thank you!
Why You’ll Love This Gluten-Free Hummus Recipe
Our gluten-free hummus recipe is about to become your new kitchen obsession, and for good reason! First and foremost, the texture is absolutely divine—silky smooth with just the right amount of thickness to cling perfectly to fresh vegetables. Each bite delivers a harmonious blend of nutty tahini, zesty lemon, earthy chickpeas, and aromatic garlic that will have your taste buds doing a happy dance.
Making hummus at home is incredibly cost-effective compared to store-bought options. A single can of chickpeas costs less than a dollar, and when combined with the other simple ingredients, you’ll get nearly double the amount you’d find in those tiny, overpriced containers at the grocery store. Plus, homemade hummus doesn’t contain any of the preservatives or mysterious additives found in commercial versions.
The magic of this recipe lies in its customizability. Once you master the basic technique, you can elevate your hummus with countless flavor combinations—roasted red pepper for sweetness, jalapeño for heat, or fresh herbs for brightness. Just like our popular Cauliflower Pizza Crust Recipe, this gluten-free hummus provides a perfect canvas for your culinary creativity. Why not experiment with different toppings and discover your signature flavor today?
How to Make Gluten-Free Hummus
Quick Overview
This gluten-free hummus recipe is a game-changer for quick, healthy snacking. What makes it truly special is how incredibly simple it is to prepare—just blend a handful of ingredients, and you’ve got a creamy, protein-packed dip ready to enjoy. The secret to its irresistible texture lies in processing the chickpeas until completely smooth, creating that restaurant-quality creaminess that makes hummus so satisfying. Best of all, you’ll only need about 15 minutes from start to finish, making this the perfect recipe for busy weekdays or last-minute entertaining.
Key Ingredients for Gluten-Free Hummus
- 1 15-oz can chickpeas (garbanzo beans), drained and rinsed
- 1/4 cup tahini (sesame paste)
- 3 tablespoons fresh lemon juice
- 2 tablespoons extra virgin olive oil, plus more for serving
- 1 medium garlic clove, minced
- 1/2 teaspoon ground cumin
- 1/2 teaspoon salt
- 2-3 tablespoons cold water
- Paprika for garnish (optional)
- Fresh parsley, chopped, for garnish (optional)
Step-by-Step Instructions
- Prepare the chickpeas: Drain and rinse the chickpeas thoroughly under cold water. For an ultra-smooth hummus, take an extra minute to remove the thin skins by gently pinching each chickpea between your fingers. While this step is optional, it results in a noticeably creamier texture.
- Combine base ingredients: In a food processor, combine the chickpeas, tahini, lemon juice, olive oil, garlic, cumin, and salt. Make sure to scrape down any tahini clinging to the measuring cup—this ingredient adds essential richness to your hummus.
- Process until smooth: Blend the mixture for 1-2 minutes until it becomes relatively smooth. Stop the processor occasionally to scrape down the sides with a rubber spatula, ensuring all ingredients are incorporated evenly.
- Add water gradually: With the processor running, slowly drizzle in the cold water one tablespoon at a time through the feed tube. This step is crucial for achieving that silky, whipped consistency that makes great hummus so addictive. Process for another 1-2 minutes until the hummus is completely smooth and fluffy.
- Taste and adjust: Stop the processor and taste your hummus. This is the time to personalize your creation—add more lemon juice for brightness, salt for flavor, or tahini for richness according to your preference.
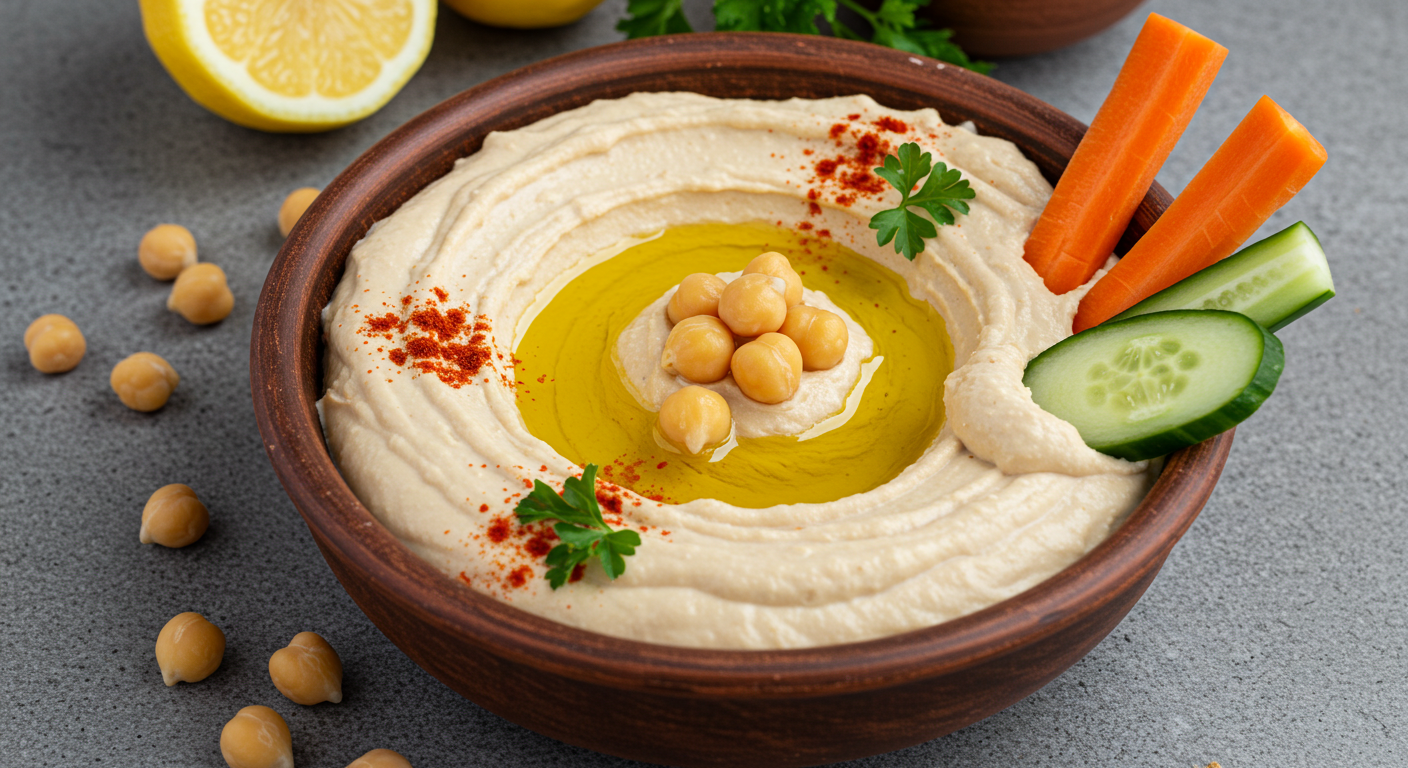
- Transfer and garnish: Spoon the finished hummus into a serving bowl. Using the back of a spoon, create a circular well in the center. Drizzle with additional olive oil and sprinkle with paprika and chopped parsley if desired. These simple garnishes not only enhance the flavor but also make your homemade hummus look professionally prepared.
4 Best Ways to Serve Gluten-Free Hummus with Veggies
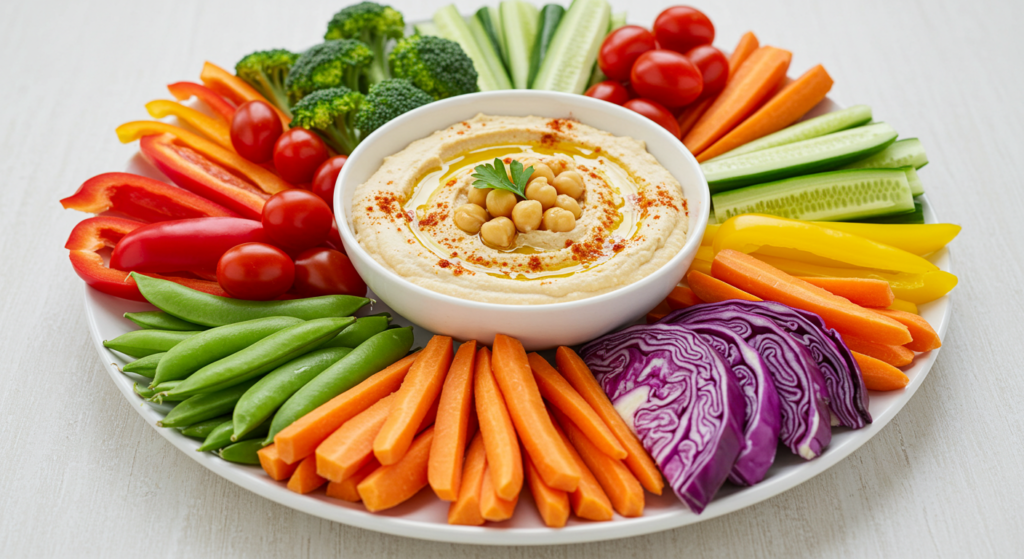
1. The Classic Rainbow Platter
Create a vibrant, eye-catching vegetable arrangement that’s as beautiful as it is delicious. Start with a generous portion of your freshly made gluten-free hummus in the center of a large platter. Surround it with a colorful array of raw vegetables arranged in rainbow order: red cherry tomatoes and bell pepper strips, orange carrot sticks, yellow squash slices, green cucumber rounds and snap peas, purple cabbage wedges, and cauliflower florets.
The beauty of this presentation isn’t just visual—it ensures a diverse range of nutrients and textures. The crisp vegetables provide the perfect contrast to the creamy hummus, creating a satisfying sensory experience with each bite. This arrangement is particularly impressive for gatherings and encourages healthy snacking.
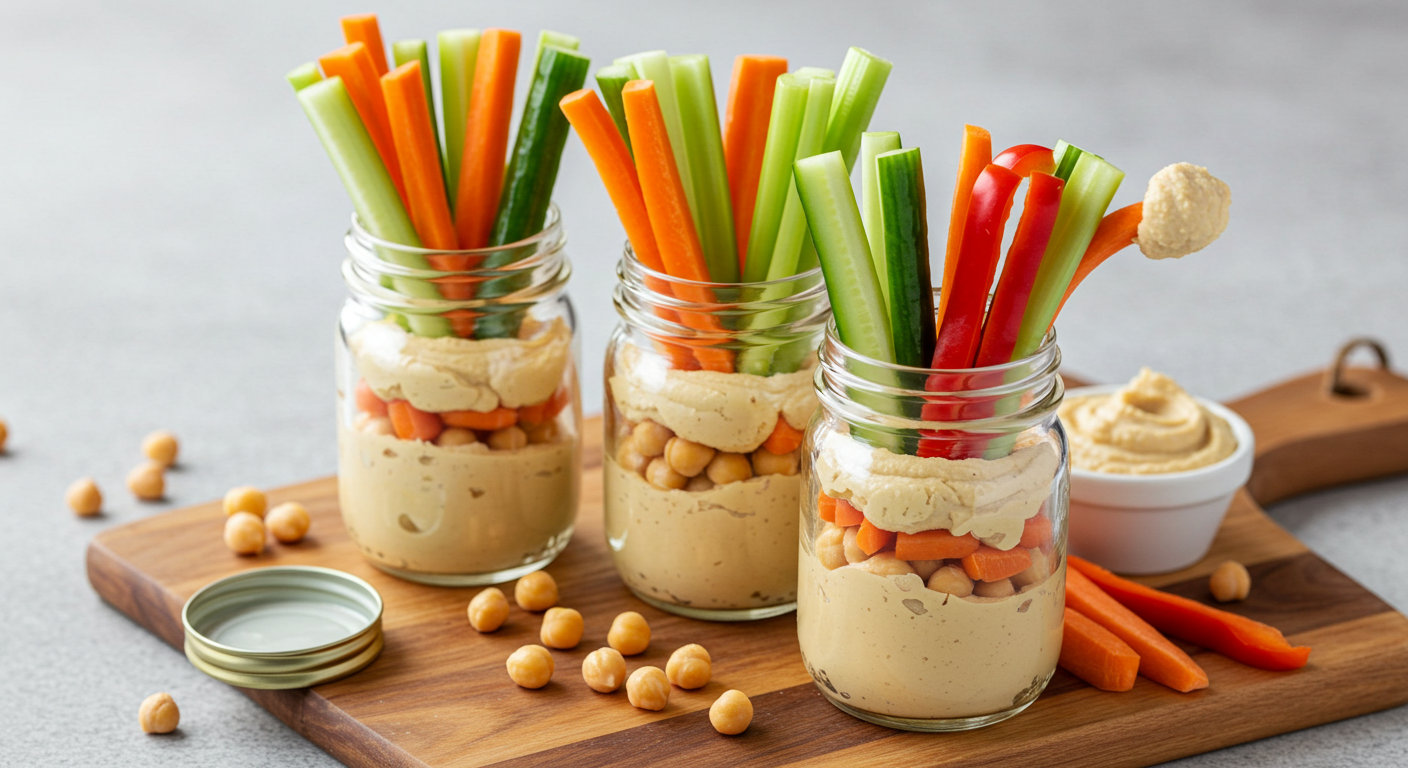
2. Mason Jar Individual Servings
Perfect for picnics, lunch boxes, or portion control, these portable hummus jars are both practical and adorable. Use small mason jars or clear plastic containers with lids. Place 2-3 tablespoons of hummus at the bottom of each jar, then stand tall vegetable sticks vertically inside—carrots, celery, bell peppers, and cucumber work beautifully.
The vertical arrangement keeps the vegetables crisp while creating an attractive presentation. For added convenience, prepare several of these jars at once and store them in the refrigerator for up to three days of ready-to-grab healthy snacking. This method is especially popular with children who appreciate having their own special container.
3. Roasted Vegetable Hummus Bowl
Elevate your hummus experience by pairing it with warm, caramelized roasted vegetables. Toss bite-sized pieces of sweet potato, zucchini, bell peppers, and cauliflower with olive oil, salt, and your favorite herbs. Roast at 425°F for 20-25 minutes until golden and tender.
Serve the hummus slightly warmed or at room temperature in a shallow bowl, creating a well in the center. Arrange the still-warm roasted vegetables around the edges and in the center depression. The contrast between the warm, caramelized vegetables and the creamy hummus creates a comforting dish that works equally well as an appetizer or light meal. The heat from the vegetables slightly warms the hummus, intensifying its flavors.
4. Stuffed Vegetable Cups
Transform vegetables into edible containers for an innovative, utensil-free snacking experience. Hollow out small vegetables to create natural cups: cherry tomatoes with tops removed and seeds scooped out, cucumber rounds with centers removed, bell pepper quarters, or small, steamed baby potatoes with the centers scooped out.
Fill each vegetable cup with a small dollop of hummus using a piping bag or small spoon. Arrange on a serving platter and garnish with a light sprinkle of za’atar, smoked paprika, or finely chopped herbs. These bite-sized treats are perfect for cocktail parties or as an elegant first course. The vegetables infuse the hummus with their flavors as they sit, creating a harmonious blend of tastes in each bite.
What to Serve Gluten-Free Hummus With
Beyond our four featured vegetable serving suggestions, gluten-free hummus pairs wonderfully with a variety of accompaniments that enhance its rich, creamy texture and nutty flavor. For gluten-free dipping options, consider rice crackers, gluten-free pita chips, or almond flour crackers that provide a satisfying crunch without any wheat exposure.
Hummus also transforms into a fantastic spread for sandwiches and wraps. Try it on gluten-free bread topped with avocado, sprouts, and sliced tomato for a nutritious lunch, or use it as a flavor-packed base inside corn tortilla wraps. The protein and fiber in hummus help create a satisfying meal that keeps you full much longer than mayonnaise or other conventional spreads.
For a Mediterranean-inspired meal, serve your gluten-free hummus alongside falafel, tabbouleh made with quinoa instead of bulgur, and gluten-free guacamole. This creates a cohesive theme that celebrates the vibrant flavors of Middle Eastern cuisine while maintaining strict gluten-free standards.
Top Tips for Perfecting Gluten-Free Hummus
Creating truly exceptional gluten-free hummus requires attention to a few key details that can dramatically improve both texture and flavor. First and foremost, don’t rush the processing time—the secret to silky smooth hummus is blending for at least 3-4 minutes total, allowing the chickpeas to break down completely. Many home cooks stop too soon, missing out on that luxurious restaurant-quality texture.
For the creamiest possible result, remove the skins from your chickpeas before blending. While this step takes an extra few minutes, the improvement in texture is remarkable. Simply pinch each chickpea gently between your fingers, and the thin skin will slip right off. Alternatively, you can rub the chickpeas between two clean kitchen towels to loosen many skins at once.
When it comes to ingredient substitutions:
- No tahini? Try unsweetened almond or sunflower seed butter instead.
- Out of fresh lemons? In a pinch, 2 tablespoons of apple cider vinegar can provide similar acidity.
- If you’re watching sodium, reduce the salt and add extra lemon zest and cumin to maintain flavor depth.
A common mistake is adding too much liquid too quickly, resulting in thin, soupy hummus. Add water or aquafaba (the chickpea liquid from the can) gradually, just a tablespoon at a time while the processor is running, until you reach your desired consistency. Remember that hummus will thicken slightly when refrigerated.
Don’t be afraid to experiment with the temperature of your ingredients. While most recipes call for room temperature components, using chilled chickpeas and ice-cold water can actually produce an exceptionally light and fluffy texture through a process similar to whipping cream.
Storing and Reheating Tips
Properly stored, your gluten-free hummus will maintain its fresh flavor and creamy texture for several days. Always transfer leftover hummus to an airtight container before refrigerating. For best results, press a piece of plastic wrap directly onto the surface of the hummus before sealing the container—this prevents the formation of a dry, crusty layer on top.
Refrigerated hummus will stay fresh for up to 5 days. You may notice that it thickens considerably when chilled; this is completely normal. Before serving refrigerated hummus, allow it to sit at room temperature for 15-20 minutes, then give it a good stir to restore its original consistency. If needed, blend in a teaspoon of water or olive oil to refresh the texture.
Freezing hummus is also an option, though the texture may change slightly upon thawing. If you choose to freeze your hummus, portion it into small, freezer-safe containers, leaving about half an inch of space at the top for expansion. Frozen hummus will keep for up to 3 months. To thaw, transfer from the freezer to the refrigerator for 24 hours, then stir well and add a drizzle of olive oil to revitalize the texture.
For the best flavor after storage, consider refreshing your hummus with a squeeze of fresh lemon juice and a drizzle of good quality olive oil just before serving. This simple step brightens the flavors and makes even days-old hummus taste freshly made.
Conclusion
Creating your own gluten-free hummus recipe at home is not just a delicious endeavor—it’s an act of culinary freedom that opens up a world of healthy snacking possibilities. By mastering this simple yet versatile dip, you’ve gained control over exactly what goes into your food while crafting something far superior to store-bought alternatives.
The four serving methods we’ve explored—the vibrant rainbow platter, convenient mason jar servings, comforting roasted vegetable bowls, and innovative stuffed vegetable cups—demonstrate just how adaptable this humble chickpea creation can be. Each presentation transforms ordinary vegetables into exciting, crave-worthy snacks that satisfy both nutritional needs and flavor cravings.
Remember that the beauty of homemade hummus lies in its flexibility. Don’t hesitate to experiment with different flavor additions or adjust the basic recipe to suit your personal preferences. Whether you’re following a gluten-free lifestyle by necessity or by choice, this protein-packed, fiber-rich dip deserves a regular spot in your culinary rotation.
We’d love to hear how your gluten-free hummus adventures turn out! Share your favorite vegetable pairings or creative serving ideas in the comments below. And if you’re looking for more gluten-free inspiration, be sure to explore our other recipes like our Cashew Cheese Dip and Cauliflower Pizza Crust. Happy dipping!
FAQ
Is hummus always gluten-free?
Traditional, homemade hummus is naturally gluten-free as its main ingredients—chickpeas, tahini, olive oil, lemon juice, and garlic—contain no gluten. However, some store-bought varieties may include additives, preservatives, or flavorings that contain hidden gluten. Always check labels carefully, especially on flavored varieties, or make your own using our recipe for guaranteed gluten-free results.
Can I use canned chickpeas for gluten-free hummus?
Absolutely! Canned chickpeas are perfect for making gluten-free hummus and save considerable time compared to cooking dried chickpeas. Just be sure to rinse them thoroughly under cold water to remove excess sodium and the starchy liquid they’re packed in. For an even smoother texture, consider removing the thin skins by gently pinching each chickpea.
How can I make my hummus smoother and creamier?
For ultra-smooth hummus, try these professional tips: remove the chickpea skins before blending, process the ingredients for at least 3-4 minutes total, add ice-cold water while the processor is running, and use fresh tahini (which tends to be smoother than older tahini that has separated). Some chefs also swear by adding a pinch of baking soda when cooking dried chickpeas to soften them further.
What are healthy alternatives to pita bread for dipping in hummus?
Fresh vegetables are the healthiest gluten-free option for enjoying hummus. Beyond the classics like carrots and celery, try endive leaves, jicama sticks, radish slices, or bell pepper strips. For a cracker alternative, consider rice cakes, gluten-free seed crackers, or baked sweet potato rounds. You can also use hummus as a spread on gluten-free wraps or as a topping for baked potatoes.
How long does homemade gluten-free hummus last in the refrigerator?
When stored properly in an airtight container, homemade gluten-free hummus will stay fresh in the refrigerator for 4-5 days. To maintain maximum freshness, press a piece of plastic wrap directly onto the surface of the hummus before sealing the container. This prevents oxidation and keeps the top layer from drying out.
Looking for more healthy, gluten-free recipes? Check out our Easy Lemon Herb Salmon Recipe or Grilled Chicken with Vegetables Recipe!