Table of Contents
Looking for the perfect healthy snack that satisfies those crunchy cravings without compromising your gluten-free lifestyle? Crispy kale chips are about to become your new obsession! These delightfully crunchy, nutrient-packed treats transform ordinary leafy greens into something truly extraordinary—a snack so addictively crispy you’ll forget they’re actually good for you.
I still remember the first time I tried making crispy kale chips at home. After countless disappointing store-bought versions that were either too soggy or too expensive, I decided to take matters into my own hands. Let me tell you, that first batch—perfectly crisp with just the right amount of seasoning—was a revelation! What amazed me most was how something so healthy could taste so indulgent.
What sets these crispy kale chips apart is their foolproof preparation method. No more soggy disappointments or burnt edges! With just 15 minutes of prep and cooking time, they’re perfect for busy weeknights when you need a quick snack or a simple side dish to round out your meal. Plus, they’re family-friendly—even the pickiest eaters tend to fall in love with their irresistible crunch.
If you’ve enjoyed our Gluten-Free Veggie Burgers, you’ll absolutely adore these crispy kale chips as another healthy, gluten-free option to add to your recipe collection. So grab a bunch of kale, preheat your oven, and get ready to discover your new favorite snack!
What is Crispy Kale Chips?
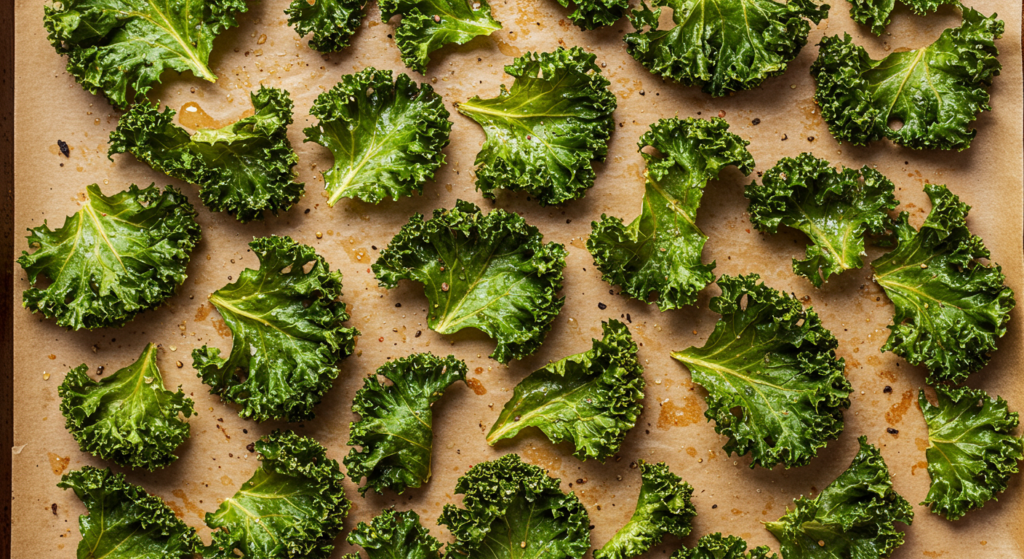
Ever wondered what all the fuss is about with these trendy green snacks popping up everywhere from health food stores to fancy restaurants? Crispy kale chips are exactly what they sound like—nutritious kale leaves transformed into light, crispy chips that make the perfect guilt-free alternative to traditional potato chips.
But why “chips” when they’re clearly not potatoes? Well, isn’t it amazing how a humble leafy green can transform into something so delightfully crunchy that it rivals its starchy counterparts? The name perfectly captures that magical metamorphosis that happens in the oven when kale leaves shed their moisture and become whisper-thin, delicately crisp morsels.
As the old saying goes, “the way to a person’s heart is through their stomach,” and these crispy kale chips have certainly won their way into many hearts—including those who typically run from anything green! Why not join the kale chip revolution and see what everyone’s talking about? Your taste buds (and your body) will thank you!
Why You’ll Love These Crispy Kale Chips
These crispy kale chips are nothing short of a snacking revelation—delivering incredible texture and flavor in every bite. The unmistakable highlight is their perfect crunch, which rivals any store-bought chip but without the guilt. Each leaf transforms into a delicate, paper-thin crisp that shatters pleasantly when you bite into it, creating a truly satisfying snacking experience.
Making crispy kale chips at home is incredibly cost-effective compared to store-bought versions. Have you seen those tiny bags of kale chips selling for $5-7 at specialty stores? For the same price, you can make several batches of fresh, homemade chips that taste infinitely better. One bunch of kale typically costs under $3 and yields a generous amount of chips—enough to satisfy even the most enthusiastic snackers in your household.
What truly elevates these crispy kale chips is how wonderfully they take to various seasonings. Whether you prefer classic sea salt, zesty lemon pepper, nutritional yeast for a cheesy flavor, or spicy cayenne for heat, these chips become the perfect canvas for your favorite flavors. The natural earthiness of kale pairs beautifully with both simple and complex seasoning blends, allowing you to customize each batch to suit your mood or match the rest of your meal.
Much like our popular Avocado Toast Recipe, these crispy kale chips prove that gluten-free eating can be both delicious and satisfying. Why not make a batch today and discover your favorite flavor combination?
How to Make Crispy Kale Chips
Quick Overview
These crispy kale chips are the epitome of simple perfection—requiring just a handful of ingredients and minimal effort to create a snack that’s both incredibly delicious and remarkably healthy. What makes these chips truly special is their delicate, shattering crispness that’s achieved through a specific preparation method rather than deep-frying. From start to finish, you’ll only need about 20 minutes—15 minutes of hands-on preparation and just 6-8 minutes in the oven—making them perfect for those moments when you need a quick, satisfying snack without the wait.
Key Ingredients for Crispy Kale Chips
- 1 large bunch of fresh kale (about 8-10 ounces)
- 1-2 tablespoons olive oil or avocado oil
- ½ teaspoon fine sea salt
- Optional seasonings: garlic powder, nutritional yeast, lemon zest, smoked paprika, or cayenne pepper
The quality of your kale matters enormously for these chips. Look for fresh, firm leaves with vibrant color and no yellowing. Both curly kale and lacinato (dinosaur) kale work beautifully, though curly kale tends to create chips with more nooks and crannies to hold seasonings.
Your choice of oil is also important—olive oil adds a lovely flavor, while avocado oil has a higher smoke point that helps prevent burning. For those avoiding oils completely, a light misting of water and a longer bake time can work in a pinch, though the results won’t be quite as crispy.
Step-by-Step Instructions
Step 1: Prepare the Kale
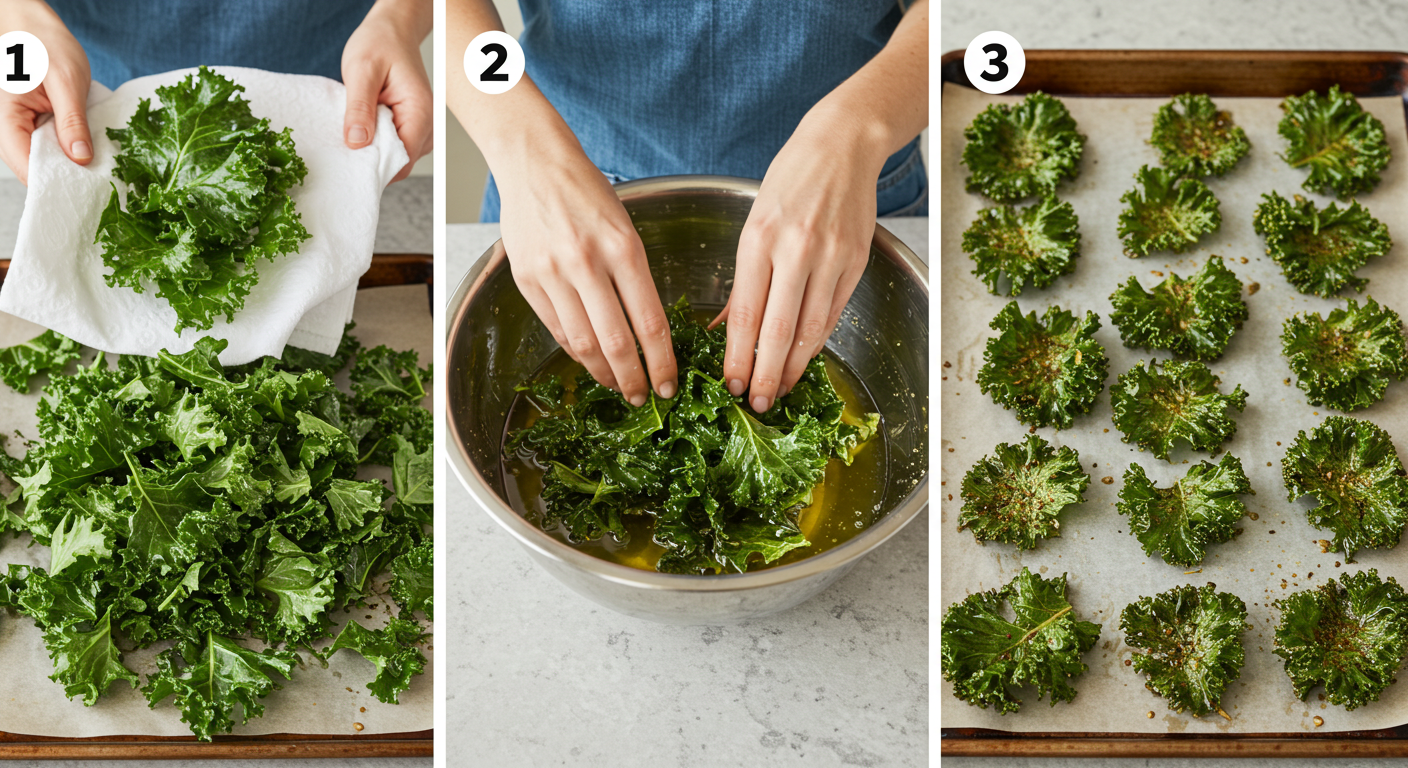
Start by thoroughly washing your kale under cool running water to remove any dirt or grit. This is crucial for both food safety and flavor—no one wants sandy kale chips! After washing, the most important step begins: drying the kale completely. Any moisture left on the leaves will create steam in the oven, resulting in soggy chips rather than crispy ones.
Once washed, remove the tough center ribs from each leaf by holding the stem in one hand and stripping the leafy parts away with your other hand. Alternatively, use kitchen scissors to cut away the leafy parts. Then tear the leaves into bite-sized pieces—about 2-3 inches wide is perfect. Remember that the chips will shrink slightly during baking.
Use a salad spinner to remove excess water, then lay the kale pieces on clean kitchen towels or paper towels. Pat them completely dry or allow them to air dry for about 10 minutes. For extra insurance against sogginess, you can even pre-dry the kale in a low oven (200°F/93°C) for 5 minutes before proceeding to the next step.
Step 2: Season Perfectly
Preheat your oven to 300°F (150°C)—this lower temperature gives you more control and helps prevent burning. Place the completely dry kale pieces in a large mixing bowl. Drizzle with just 1-2 tablespoons of oil—a little goes a long way here. Using your hands, massage the oil into every surface of the kale, making sure each piece is lightly coated. This massage serves two purposes: it ensures even coating of oil and begins breaking down the fibrous structure of the kale, leading to a more delicate final texture.
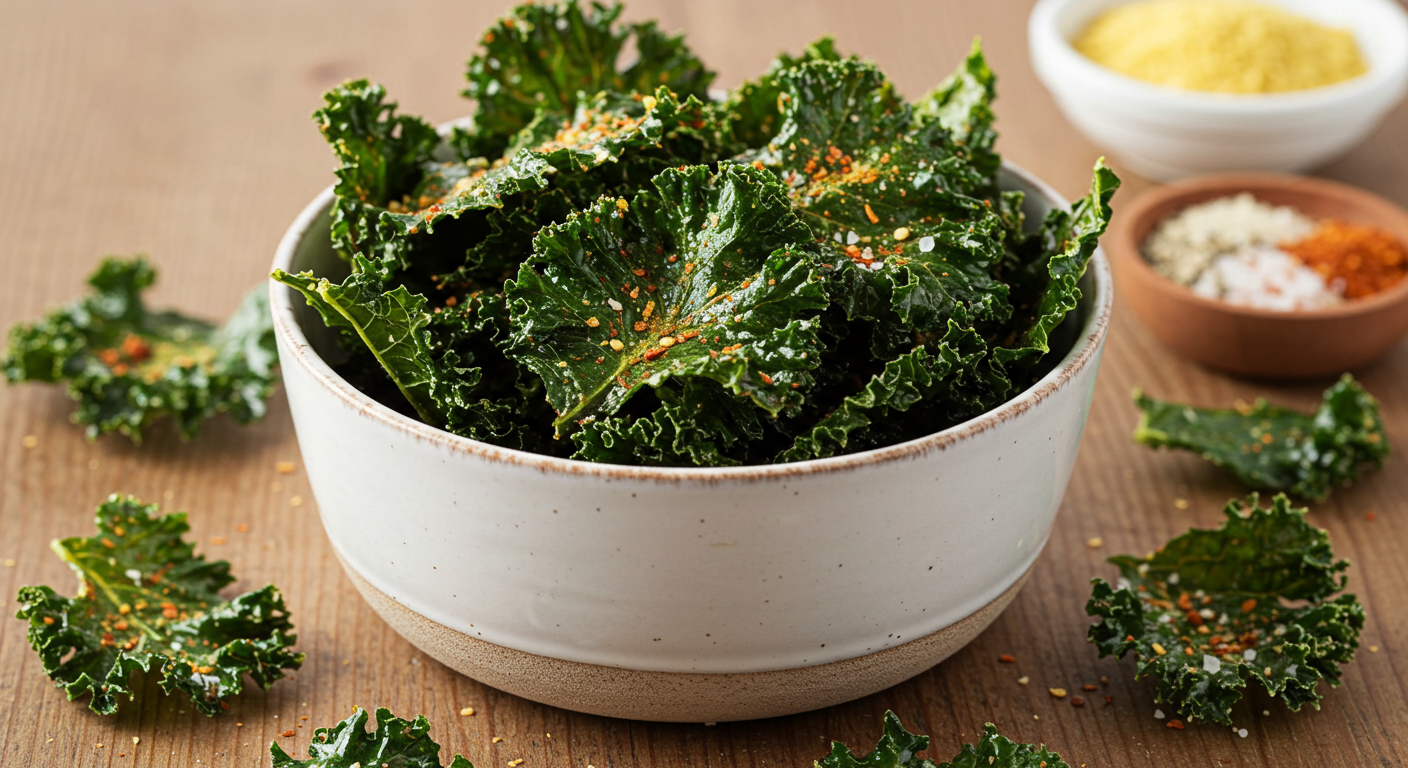
Once the kale is coated with oil, sprinkle with sea salt and any additional seasonings you desire. Classic options include garlic powder, nutritional yeast for a “cheesy” flavor without dairy, lemon zest for brightness, or smoked paprika for a hint of heat. For those who enjoy spice, a pinch of cayenne creates a delightful kick. Toss gently to distribute the seasonings evenly.
Step 3: Bake to Perfect Crispness
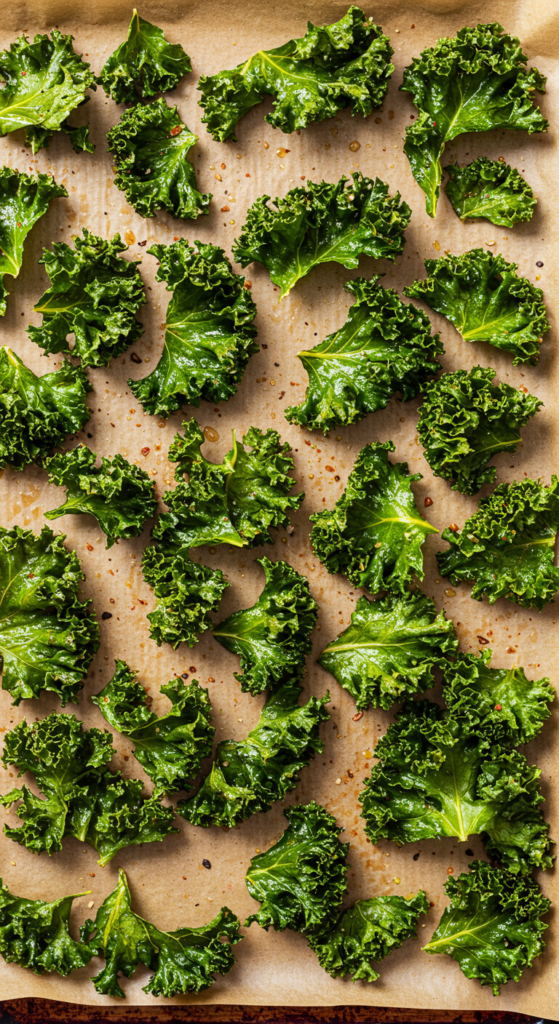
Line large baking sheets with parchment paper—this prevents sticking and makes cleanup easier. Arrange the seasoned kale pieces in a single layer, being careful not to overlap them. Crowding the pan will lead to steaming rather than crisping. If necessary, use multiple baking sheets or bake in batches.
Place the baking sheets in the preheated oven and bake for 6-8 minutes. This is where the magic happens! The key to perfect crispy kale chips is attentive baking—start checking them at the 5-minute mark, as they can go from perfectly crisp to burnt very quickly. The chips are done when they’re completely dry and crisp to the touch, but still maintain their vibrant green color. If they’ve turned brown, they’ve likely become bitter.
Remove from the oven and allow the chips to cool completely on the baking sheets. This final cooling step is crucial—the chips continue to crisp up as they cool. Resist the temptation to sample them immediately (difficult as that may be!). Once cooled, your crispy kale chips are ready to enjoy!
What to Serve Crispy Kale Chips With
These versatile crispy kale chips can stand alone as a delightful snack, but they also make wonderful accompaniments to a variety of dishes. For a well-rounded appetizer spread, pair them with hummus, guacamole, or a yogurt-based dip that complements their earthy flavor. The contrasting textures—crispy chips and creamy dips—create a satisfying sensory experience.
For lunch or dinner, serve crispy kale chips alongside sandwiches or wraps as a healthier alternative to potato chips. They’re particularly excellent with our Banza Pasta, adding a nutritious crunch that balances the hearty pasta perfectly. The chips also make a beautiful garnish for soups, adding texture and visual appeal when crumbled on top just before serving.
Beverage pairings matter too! These crispy kale chips shine alongside sparkling water with citrus, a crisp white wine, or even a light beer. For non-alcoholic options, an iced tea or lemonade provides refreshing contrast to the savory chips. The slight bitterness of the kale is wonderfully complemented by drinks with a touch of sweetness or acidity.
Top Tips for Perfecting Crispy Kale Chips
Achieving consistently perfect crispy kale chips requires attention to a few critical details. First and foremost: moisture is the enemy of crispness. Beyond thoroughly drying your kale leaves as mentioned earlier, try spreading the washed leaves on a kitchen towel and letting them air dry for 30 minutes before preparing them. Some chefs even recommend washing your kale the day before and storing it uncovered in the refrigerator overnight to ensure it’s completely dry.
When it comes to ingredient substitutions, flexibility is your friend. No olive oil? Coconut oil works beautifully, adding a subtle tropical note to your chips. For those avoiding oil altogether, a light spritz of lemon juice or apple cider vinegar can help seasonings adhere, though the chips won’t be quite as crispy. Experiment with different kale varieties too—lacinato (dinosaur) kale creates a flatter, more uniform chip, while curly kale offers more texture and surface area for seasonings.
A common mistake is overbaking, which results in bitter, brown chips rather than crispy green ones. To avoid this, arrange an oven rack in the middle position (not too close to heating elements) and consider opening the oven door briefly halfway through baking to release steam. If your oven has hot spots, rotate the baking sheet at the halfway point. Remember that kale chips continue to crisp as they cool, so it’s better to slightly underbake than overbake.
For those with convection ovens, reduce the temperature by 25°F and check the chips after just 5 minutes. Air fryers also make excellent crispy kale chips—try 360°F for 4-5 minutes, shaking the basket halfway through. No matter which method you choose, let the chips cool completely before storing or serving to achieve maximum crispness.
Storing and Reheating Tips
Proper storage is crucial for maintaining the perfect texture of your crispy kale chips. When stored correctly, these delicate treats can retain their crunch for up to one week. The most important factor is protecting them from moisture, which quickly turns crispy chips soggy and unappetizing.
For short-term storage (2-3 days), place completely cooled chips in a paper bag left slightly open. The paper absorbs any ambient moisture while allowing air circulation. For slightly longer storage (up to 5 days), use an airtight container with a piece of paper towel at the bottom to absorb moisture. Store the container in a cool, dry place—not in the refrigerator, where humidity will quickly soften your crispy masterpieces.
If your kale chips have lost their crunch despite your best storage efforts, don’t despair! They can be easily revitalized. Spread them on a baking sheet and place in a 250°F (120°C) oven for 5-10 minutes, watching carefully to ensure they don’t burn. Let them cool completely before enjoying or storing again—they’ll regain much of their original crispness.
While kale chips can technically be frozen, the freezing and thawing process typically ruins their delicate texture. Instead of freezing finished chips, consider prepping kale leaves (washed, dried, and de-stemmed) and freezing them ready to be made into chips when the craving strikes. This approach saves time while ensuring you always enjoy the freshest, crispiest results.
Conclusion: Enjoying Your Homemade Gluten-Free Treat
Congratulations! You’ve mastered the art of making perfectly crispy kale chips that are not only deliciously addictive but also completely gluten-free. These versatile, nutrient-packed snacks prove that gluten-free eating doesn’t mean sacrificing flavor or satisfaction. With their perfect crunch and endless seasoning possibilities, these crispy kale chips are bound to become a regular feature in your snack rotation.
What makes these chips truly special is how they transform a humble leafy green into something extraordinary—a testament to how simple ingredients, prepared with care, can create remarkable results. Whether you’re following a gluten-free lifestyle by necessity or choice, these crispy kale chips offer a wholesome alternative to processed snacks without compromising on taste or texture.
We encourage you to experiment with different varieties of kale and creative seasoning combinations to discover your perfect chip. Consider them a blank canvas for your culinary creativity! Share your homemade crispy kale chips with friends and family—they make wonderful gifts packaged in clear bags tied with rustic twine, perhaps alongside a note with your special seasoning blend.
Remember, the key to consistently perfect crispy kale chips lies in those three crucial steps: thorough drying, proper oil massage, and attentive baking. Master these fundamentals, and you’ll never suffer through a soggy kale chip again! Why not make a batch today and experience the satisfaction of creating this delightfully crispy, gluten-free treat in your own kitchen?
FAQ
Why aren’t my kale chips getting crispy?
The most common reason for soggy kale chips is excess moisture. Make absolutely sure your kale leaves are completely dry before adding oil. If you’ve washed your kale, use a salad spinner followed by patting with paper towels. Another culprit might be overcrowding your baking sheet—kale leaves need space around them to crisp properly, so bake in batches if necessary.
Too much oil can also prevent crispness. You need just enough to lightly coat the leaves—about 1 tablespoon per bunch of kale. Finally, your oven temperature might be too low. The sweet spot is typically between 300°F and 325°F (150°C-165°C), which allows the moisture to evaporate without burning the delicate leaves.
Are kale chips actually healthy?
Absolutely! Crispy kale chips retain most of the nutritional benefits of raw kale, which is considered one of the most nutrient-dense foods available. One serving provides significant amounts of vitamins A, K, and C, along with minerals like manganese, calcium, and potassium. They’re also rich in antioxidants like quercetin and kaempferol.
The minimal processing and careful baking preserve these nutrients while enhancing kale’s digestibility. The small amount of healthy oil used in preparation actually helps your body absorb the fat-soluble vitamins in the kale. Compared to traditional potato chips, crispy kale chips typically contain fewer calories, significantly less fat, and more fiber, making them a genuinely nutritious snack option.
How do you keep kale chips crispy?
The secret to maintaining crispness is proper cooling and storage. Always allow your kale chips to cool completely on the baking sheet before transferring them to a storage container. This final cooling period is when they develop their ultimate crispness.
For storage, avoid plastic bags, which trap moisture. Instead, use paper bags left slightly open, or airtight containers with a small paper towel at the bottom to absorb moisture. Store at room temperature in a dry place—never in the refrigerator. For maximum crispness, consume your kale chips within 2-3 days of making them, though they can last up to a week with proper storage.
Why did my kale chips get soggy?
Kale chips typically become soggy due to moisture exposure after baking. This could happen if they weren’t completely cooled before storage, or if they were stored in a humid environment or airtight container without moisture absorption. Even ambient humidity on a rainy day can affect your chips’ texture.
If you’ve noticed your perfectly crisp chips becoming soggy within hours, check that they’re fully cooled before storing, and consider adding a desiccant packet or paper towel to your storage container. If you live in a humid climate, consuming your chips fresh is ideal, or refresh them briefly in a low oven before serving if they’ve softened.
[Check out our Gluten-Free Veggie Burgers for another healthy snack option!]
Looking for quality coffee to enjoy with your crispy kale chips? Check out this HiBREW Electric Coffee Grinder with 31 gears for espresso and American coffee, featuring visual bean storage.